A well-crafted deck is more than just an outdoor space. It’s a sanctuary for relaxation, gatherings, and cherished memories. As the sun-kissed days of outdoor living beckon, laying decking boards becomes a skill. Mastering this process is the foundation of a sturdy, inviting deck.
In this guide, we’ll walk you through the steps to transform raw materials into a stunning platform. Discover the secrets to proper spacing, secure attachment, and impeccable finishing touches. Let’s dive into it, shall we?
Materials Needed
- Timber decking boards: Choose quality, weather-resistant boards for longevity.
- Ledger boards, joists, and beams: Create a sturdy framework for your deck’s foundation.
- Screws/nails: Essential for securing boards to the frame.
- Measuring tape and chalk line: Ensure accurate dimensions and alignment.
- Circular saw: Trim boards for a professional fit.
- Drill with screwdriver bit: Fasten boards securely to the frame.
- Spacers: Maintain uniform gaps between boards for expansion.
- Level: Guarantee a flat and balanced deck surface.
Step 1: Prepare the area
Proper ground preparation is the cornerstone of a durable decking wood. Clear existing vegetation, if there’s any, for a clean canvas. Doing so will also prevent future growth from compromising your structure.
Level the ground for an even foundation, preventing tilting or sinking over time. Consider adding a weed barrier beneath the deck to inhibit weed growth. This initial groundwork sets the stage for a visually pleasing deck. It also extends its lifespan, shielding it from potential hazards.
Step 2: Install the support structure
The support structure is the backbone of your decking timber’s integrity. Begin with ledger boards securely attached to your house. Joists, the horizontal beams supporting the boards, are then affixed across the ledger and beams. These beams provide the horizontal foundation for your deck.
The key? Precision. Ensure consistent spacing between joists and beams for stability, evenly distributing weight. Proper alignment guarantees a level surface, preventing sagging and wobbling. This framework construction sets the stage for a safe, resilient, and long-lasting deck.
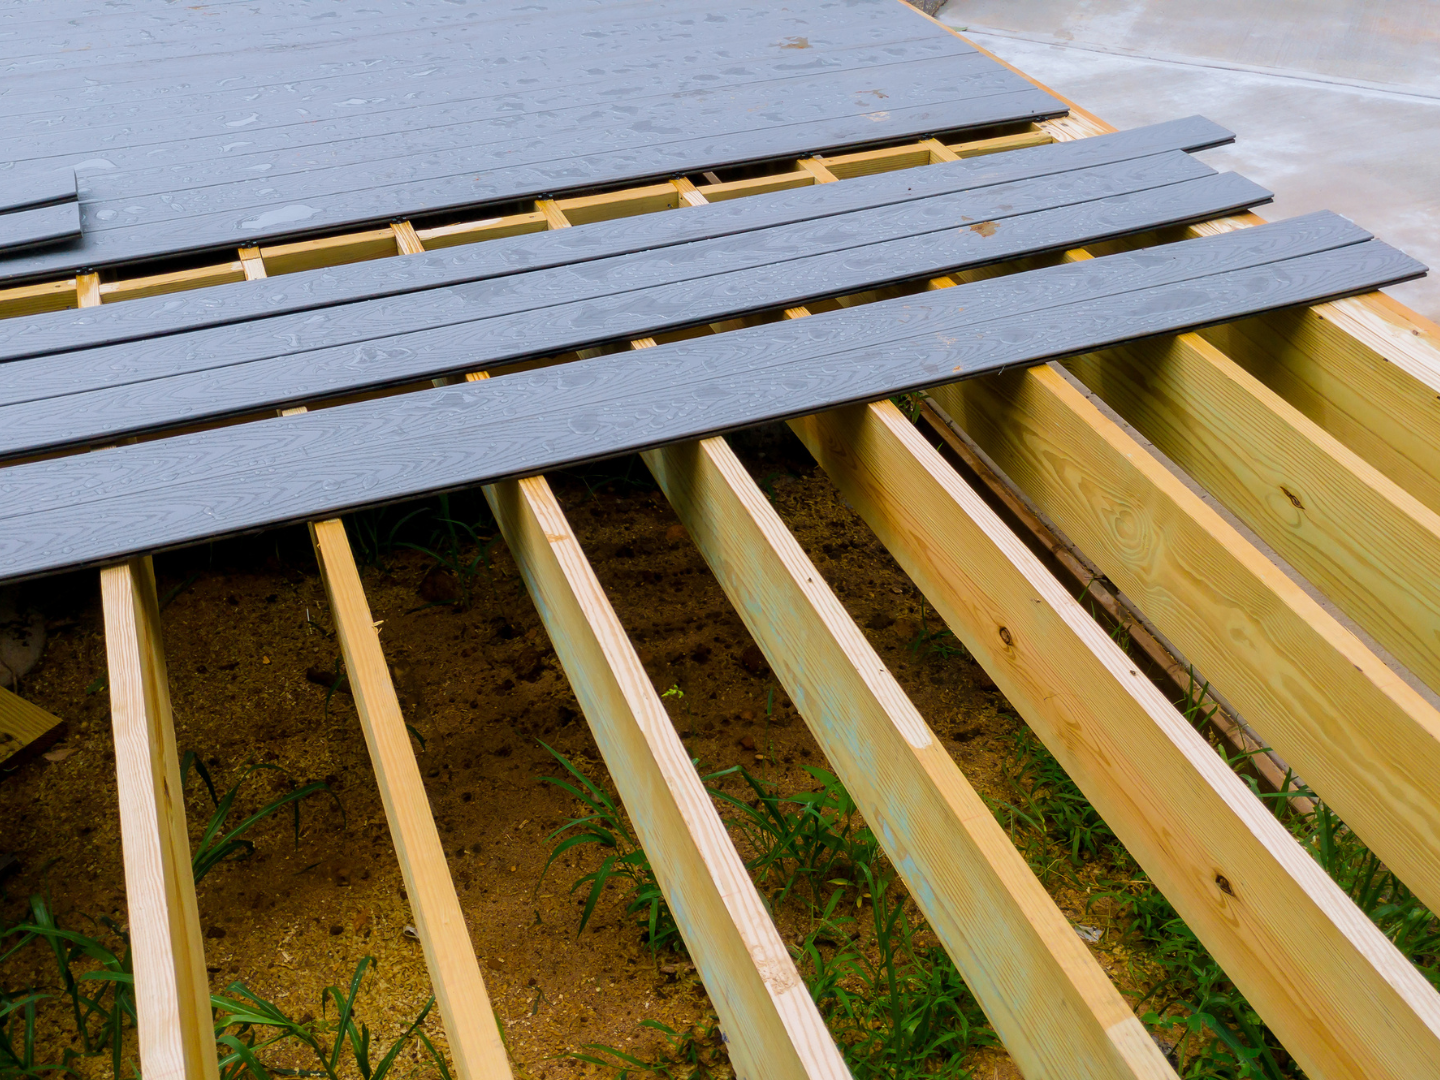
Step 3: Place the timber decking boards
Start by positioning the initial decking board, flush with the outer edge of the frame. Secure it using screws, drilled through the panel into the joists below. This first board serves as a reference point for the rest.
As you lay subsequent boards, integrate specialised spacers between them. These spacers, often designed for uniform gaps, ensure efficient drainage. Also, they allow for natural expansion and contraction of the wood due to weather changes. Maintain a consistent gap – about 1/8 to 1/4 inch – between each panel.
This spacing technique not only enhances visuals but also fosters a robust structure. This allows the wooden decking boards to breathe and adapt over time.
Step 4: Secure the boards
Proceed by affixing the remaining decking boards wood using appropriate screws or nails. Place fasteners through the top of each board, securing them into the joists below. This ensures a secure hold while preventing tripping hazards caused by exposed fasteners.
To maintain consistent spacing and alignment, use a chalk line or string as a guide. Attach one end to the outer board and the other to the inner edge of the frame. As you attach panels, use this guide to ensure parallel alignment. Employ the specialised spacers between each board to guarantee uniform gaps. Doing so will promote both stability and aesthetic harmony.
Step 5: Trimming and finishing
Trimming the overhanging boards elevates your decking’s appearance from functional to polished. Neatly trimmed edges provide a clean and professional look. They enhance the overall aesthetic of your outdoor space.
For precise and efficient trimming, use a circular saw with a fine-tooth blade. Alternatively, specialised deck panel trimming tools are designed for this purpose. These tools ensure smooth, even cuts that provide the seamless visual appeal of the deck.
Step 6: Treat and maintain the wood decking boards
Applying a protective finish or stain to the boards is vital in ensuring their longevity. These treatments shield the wood from moisture, UV rays, and other environmental factors. In return. decay is less likely, extending the life of your deck.
Regular maintenance is key to preserving your investment’s beauty. Regularly clean your deck to remove dirt and debris. Additionally, reapply finishes or stains as recommended by the manufacturer. This prevents weathering and keeps your deck looking vibrant for years to come.
Round-up
A well-constructed deck stands as a testament to both craftsmanship and comfort. Here, you’ve uncovered the secrets behind:
- a sturdy foundation
- precise placement
- meticulous finishing
Remember, your deck is more than wood and nails; it’s a canvas for cherished moments. So, armed with your newfound knowledge, embark on your decking journey with confidence!
For custom timber, look no further than TimberX. Here, we offer high-quality outdoor timber boards and more. You also wouldn’t want to miss our guide to ‘How Do You Install Roofing Battens?’